

The Engagement Ring You Already Own Is the Starting Point — How to Build a Stack Around It
You already have the centrepiece. Everything that comes after it — the curved band that nestles against your setting, the slim line of pavé that adds a little more brilliance, the eternity that makes the whole hand look considered — those are the decisions that turn one ring into a stack. And they are much easier to make than most people expect.
Building a stack around an existing engagement ring isn't complicated, but it's easy to get wrong if you start from the wrong place. Most women do: they shop for a band they love on its own, add it to the finger, and wonder why the result looks messy instead of intentional. The fix is simple. Start from your engagement ring and work outward, not the other way around.


Start with your engagement ring's shape — not with a band you love
The most common stacking mistake is buying a band because it looks beautiful in isolation. The problem is that a band on its own and a band beside your specific engagement ring are two very different things. The centre stone's shape changes everything: its height above the finger, its footprint across the band, the angle of its prongs, and how far the setting extends to each side all determine what sits against it cleanly.
Here's how to think about it by shape:
- Round and cushion cuts: The most forgiving shapes for stacking. Bands with a gentle curve — chevron or wishbone shapes — nestle right in at the shoulder. Straight bands also work well because round and cushion stones sit high enough that a flat band doesn't clip the setting. You have the widest range of options here.
- Oval cuts: The elongated footprint means you need to consider east-west clearance. Curved bands are ideal — they follow the stone's shoulder rather than running straight underneath it. A straight band will often still work unless the stone sits very low, in which case check that the stone's edge doesn't overlap the band's outer edge.
- Pear and marquise cuts: The pointed tips can catch on anything placed too close. A curved band that follows the direction of the tip's angle is the safest choice. Avoid any band with a raised ridge that runs parallel to where the point sits, as it will create an uncomfortable gap or pressure point over time.
- Princess and emerald cuts: Straight-edged stones that typically extend to the edge of the setting. The cleanest pairing is a flush-fitting straight band that's the same width as the setting. Anything much wider will gap at the shoulder; anything much narrower will disappear beneath the stone's shadow.
Worth knowing: "Flush fit" means the band sits against the engagement ring with no visible gap at the point where they meet. Curved (wishbone or chevron) bands achieve a flush fit against almost any stone shape because the curve's peak meets the setting rather than the flat edge of the band trying to slide beneath it. Straight bands achieve flush fit only when the stone's footprint doesn't extend past the band's edge.
The three band types, and what each does to a stack
Every stacking band falls into one of three structural categories. Understanding what each one does — not just how it looks — helps you make deliberate decisions rather than random ones.
The flat eternity band
A continuous line of stones that goes all the way around the finger. Because there's no break in the sparkle, it reads as a single, uninterrupted statement. That's its strength — and its one limitation. Placed on one side of your engagement ring, it looks polished and complete. Placed on both sides, it creates a symmetrical trio that reads as a deliberate set.
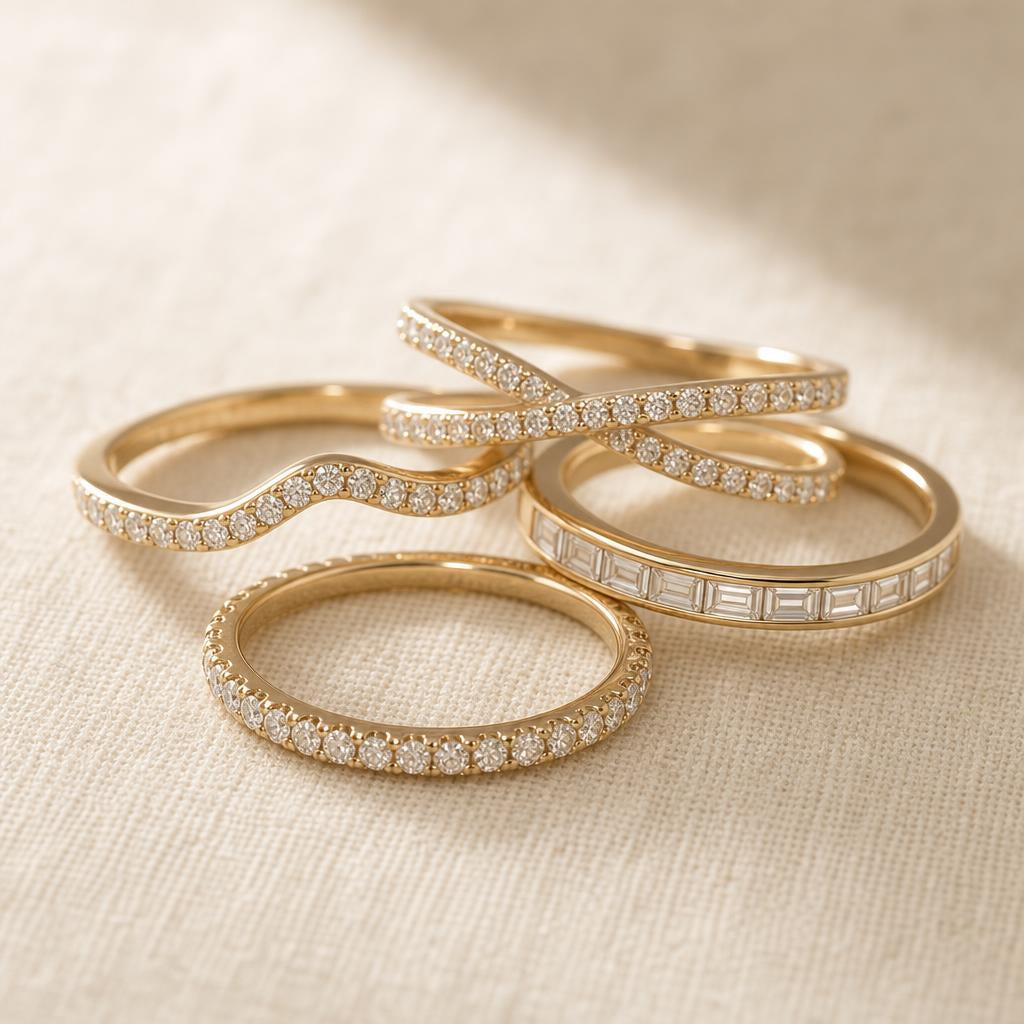
The Eternity Ring is the version to start with if you want this style. The round pavé setting keeps the band's profile slim, which means it sits flat against your engagement ring without any unwanted bulk — a detail that matters considerably more once you have three rings on one finger and start feeling the difference in how they move.

The Eternity Ring
A continuous circle of pavé-set round simulated diamonds — slim, stackable, and versatile enough to wear against any engagement ring shape. Works on either side, or both at once.
Shop The Eternity Ring →The curved or wishbone band
A band with an upward curve at the centre, so the peak of the band meets the shoulder of your engagement ring rather than running straight underneath it. This creates a flush fit with no visible gap — which is why curved bands are the most universally recommended first addition to any engagement ring, regardless of stone shape.
The Wishbone Ring is a strong first choice here. The curve is subtle: it reads as a gentle chevron rather than a dramatic V, which keeps it from looking too bridal and makes it easy to wear every day. Placed against a round or oval stone on one side, it creates a clean uninterrupted line from the setting outward, with no awkward gap where the band meets the prongs.
The crossover or intertwined band
Two pavé bands that intersect at the top, creating a crossed silhouette. The crossover reads as a single band but adds dimension — the meeting point adds just enough height to feel distinct from a flat band without pushing the rings on either side outward on the finger. It works best as a single addition on one side of your engagement ring rather than as one band among several.
The Destiny Ring is the crossover to consider first. The two pavé lines are fine enough that the design doesn't compete with the engagement ring — it reads as an accent to the set rather than a centrepiece — and the overall profile stays narrow enough that a second band can still sit beside it comfortably if you want to add more later.

The Devotion Ring
A continuous circle of channel-set baguette simulated diamonds — a different texture to round pavé that adds visual depth when layered with a softer curved band on the opposite side.
Shop The Devotion Ring →How many rings is actually enough?
Two bands — one on each side of the engagement ring — is the most common configuration, and for most people it's also the ideal one. It's balanced, contained, and reads as a complete look rather than a work in progress. It's also usually the natural stopping point before the rings start shifting or the combination becomes uncomfortable when you close your hand fully.
Three bands plus the engagement ring is achievable on many hands, but it requires very slim bands — 1.5mm to 2mm each — and each band needs to sit flush without any raised edges that might catch against the next. If any ring in the stack has an elevated setting, a high ridge, or an unusual interior profile, you're likely limited to one band per side.
Four or more rings on a single finger starts to work against you. Bands migrate, settings catch against each other, and the engagement ring can begin to look diminished rather than elevated by its company. If you want the visual density of a large stack, you'll get a better result by wearing a complementary ring on an adjacent finger — middle or index — rather than crowding everything onto the ring finger.
✦ Practical check: Before buying a second band, put your engagement ring on and measure the available space on one side with a thin strip of card. This tells you exactly how much room you have to work with — and prevents the frustration of buying a band that turns out to be a millimetre too wide to sit comfortably against your setting.
Width: the detail most stacking guides skip
Band width has a disproportionate effect on how the finished stack reads. A millimetre or two in the wrong direction — wider than the hand can comfortably carry, or narrower than the stone needs as a visual anchor — throws the whole balance off.
- Slim hands and shorter fingers: Bands under 2mm feel most proportionate. Anything wider starts to dominate the finger and draws the eye away from the engagement ring rather than toward it.
- Average or longer fingers: You can carry up to about 3mm without losing the stone's visual presence. Beyond that, ask honestly whether the band is acting as a stacking accent or whether it's becoming a centrepiece in its own right.
- Elongated oval or cushion stones: A wider band — up to 4mm — can work well here because the stone's elongated footprint visually balances a broader presence beside it. The length of the stone makes width on the sides read as considered rather than heavy.
When in doubt, go narrower than you think you need. A narrow band beside a large stone looks intentional. A wide band that visually competes with the stone rarely does.
Metal tones: when matching matters and when it doesn't
The traditional rule is to match metals exactly — white gold with white gold, yellow gold with yellow gold. That advice made more sense when jewellery was kept for decades and resale was part of the calculation. For rings worn as everyday stackers, the rules are considerably more relaxed.
Mixing metals intentionally — a yellow gold eternity beside a white gold engagement ring — is a legitimate and well-established choice. The key word is intentional: the contrast needs to read as a decision, not an accident. A gold band beside a slightly gold-tinted white metal setting looks unintentional. A bright warm gold band beside a clearly cool, rhodium-white setting looks like a considered pairing.
Rose gold sits between the two in warmth and mixes more easily with both cool and warm tones than yellow and white mix with each other. If you're uncertain and want to test mixed metals without a large commitment, start with a rose gold band — it reads as complementary rather than clashing against almost any engagement ring metal.
Worth knowing: Rhodium-plated white gold and 925 sterling silver with rhodium plating are visually identical in everyday wear. If your engagement ring is rhodium-plated white gold (which almost all white gold settings are), a sterling silver pavé stacking band will match it perfectly — there is no visible difference on the hand.
Build the stack one ring at a time
The most consistent stacking mistake is buying three bands at once and discovering they don't work together once they're all on the finger. The engagement ring is the one constant. Everything else should be introduced incrementally — one piece at a time — so you can see how each addition actually reads before committing to the next.
The logical sequence:
- Start with one curved band on the side you see most often — for most people, the side closest to the palm when the hand is at rest. A wishbone or chevron shape is the safest first choice because it creates a flush fit against any engagement ring shape without any guesswork.
- Wear it for two to four weeks before deciding whether to add more. Notice whether it shifts, catches, or feels uncomfortable during daily tasks. Notice also whether the look feels complete or whether it reads like it's waiting for something.
- If you decide to add a second band, place it on the opposite side — and make it a different style from the first. A slim eternity on one side and a curved band on the other creates more visual movement than two identical rings.
- After that, ask honestly whether the stack needs more. Two bands beside one engagement ring — three rings in total — is usually exactly enough. The stack looks intentional, the engagement ring remains the clear centrepiece, and the whole combination is comfortable enough to wear all day without thinking about it.
Quick Takeaways
- Always start from your engagement ring's shape — not from a band you love in isolation
- Curved (wishbone or chevron) bands create a flush fit against any stone shape and are the safest first addition
- One band on each side of the engagement ring is the most balanced and practical configuration
- Choose bands narrower than you think you need — width is easier to add in the next purchase than to subtract from this one
- Mixing metals is fine when the contrast reads as intentional; rose gold mixes most easily with both warm and cool tones
- Build the stack incrementally — one ring at a time, wearing each addition before deciding on the next
Frequently asked questions
Can I add stacking bands to a ring with a raised halo setting?
Yes — but your options are slightly narrower than with a plain solitaire. The halo extends the stone's footprint sideways, so a straight band that would sit cleanly against a solitaire may gap against a halo. Curved bands work best because the apex of the curve meets the halo's outer edge rather than the shank running beneath it. Very slim pavé bands under 1.5mm can also fit neatly depending on how far the halo extends — worth measuring before buying.
Do the stacking bands need to match each other in width?
No — and varying widths usually looks better than matching them exactly. A common combination: a 2mm eternity on one side and a 1.5mm curved band on the other. The slight difference reads as intentional rather than mismatched, and it helps the eye move across the stack rather than reading it as one solid block of the same visual weight.
My rings keep rotating on my finger. What's causing it?
Rotation is almost always a fit issue — the rings are slightly too large. A half-size reduction typically solves it. If the rings are correctly sized but still rotate, check whether the interior of the band is completely smooth — any upward curve or texture on the inside surface causes more rotation than a flat, polished interior. Very slim bands under 1.5mm also tend to rotate more than wider ones because there's less contact area keeping them stable on the finger.
Does the stacking band have to go on the same finger as the engagement ring?
No. A stacking band on the middle finger adjacent to the ring finger is a completely legitimate styling choice — and sometimes a better one, because it lets you vary the visual weight on each hand independently. The only consideration is that the pairing should look considered, not accidental. A thinner, complementary band on the middle finger beside a fuller ring stack reads as deliberate. A heavier, contrasting ring in the same position can compete in a way that works against both.
Your engagement ring already gives you the strongest possible starting point. Everything that comes after it is about finding pieces that sit beside it cleanly, quietly, and without asking for equal attention. Start with one band, wear it for a while, and see whether you want more. More often than not, one is enough to change everything — and two is usually all you'll ever need.


